
Halloween is just around the corner, and what better way to set the eerie mood than with some creepy potion bottles? Whether you're hosting a Halloween party or you're a fan of Harry Potter, these DIY Halloween potion bottles will add a touch of magic to your decor. And the best part? We've got you covered with free, printable labels to make this project even easier!
Bottles for Halloween Potions
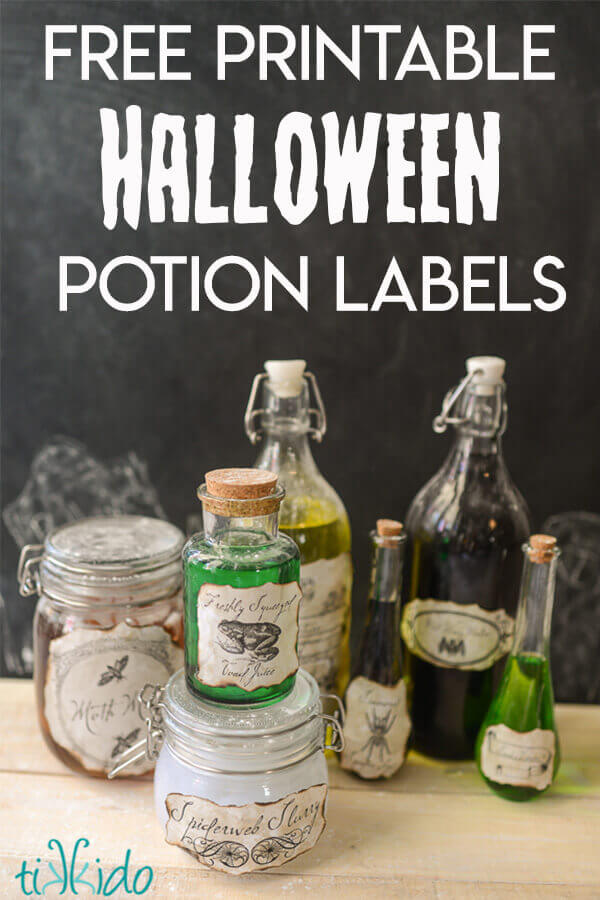
To get started, you'll need some bottles and jars. Look for ones with stoppers or lids in various sizes and shapes. You don't need to spend a fortune on expensive containers; Ikea and the dollar store have some great options at affordable prices.
Halloween Potion Bottle Labels
Next, you'll need labels for your potion bottles. We've designed these free printable Halloween potion labels just for this project. And let us tell you, they turned out fantastic!
.JPG)
Even if you're not a graphics person, these labels are easy to use and will give your potion bottles an authentic, aged look.
How to Age Paper for Halloween Potion Bottles
Once you've printed out the labels on plain printer paper, it's time to give them that aged, spooky look. We recommend using the classic technique of tea staining. Rather than soaking the paper in tea, simply blot it with a wet tea bag. This method creates the perfect mottled, browned effect and dries much quicker.
.JPG)
To add the finishing touches, distress the edges of the labels by holding them over a candle flame. The paper will curl and brown beautifully.
Finishing the DIY Potion Bottle Labels
Now it's time to assemble your potion bottles. Cut out the labels and use a hot glue gun to attach them to your glass jars. Once the labels are securely in place, fill the bottles with your chosen concoctions.
What to Put in Halloween Potion Bottles
The possibilities are endless when it comes to filling your DIY potion bottles. You can start with simple colored water using food coloring or get more creative with other liquids and solid materials.
.JPG)
For a quick and easy solution, use food coloring and water. However, be aware that red and pink colors may fade in direct sunlight. If you want a red potion, it's best to keep it out of the sun.
If you want to take it a step further, experiment with other liquids like tea or add solid items to create creepy effects. You can use things like polyester fiber stuffing, clear water beads, or small plastic toys to give your potion bottles a mysterious touch.
.JPG)
These DIY potion bottles make for a fantastic Halloween centerpiece. And if you want to enhance the spooky atmosphere, add a sprinkle of baby powder to make them look like they just came from a dusty apothecary shelf.
So, get your bottles, print out the labels, and let your creativity flow! It's time to create some truly bewitching Halloween potion bottles.
Other Halloween Tutorials You Might Like
Looking for more Halloween projects? Check out these other tutorials:
- Googly Eyes Halloween Napkin Ring Tutorial
- Peter Pan Shadow Costume
- DIY Crystal Bloody Cut Throat Necklace Tutorial
- Googly Eyes Headband Tutorial
Remember, Shill Art is here to help you express your creativity. Join our community on Facebook and Pinterest for more inspiration. And don't forget to browse our collection of Coloring Books for even more artistic adventures. Happy Halloween crafting!
Follow us on:
- Facebook fanpage:https://www.facebook.com/ShillArt.Official
- Facebook group:https://www.facebook.com/groups/FreeColoringPagesToPrint
- Pinterest:https://www.pinterest.com/ShillArtOfficial
More Coloring Books at here, see now:https://shillart.com/coloring-books