
Easter is a cherished holiday filled with joy, vibrant decorations, and delicious treats. One of the highlights of Easter is undoubtedly the colorful Easter eggs. Whether you're planning to decorate eggs or simply want to hone your artistic skills, knowing how to draw an Easter egg can be incredibly helpful. In this step-by-step guide, we'll take you through the process of drawing and designing your very own Easter egg. So, let's dive in and discover the magic of creating beautiful Easter eggs!
Let's Get Started!
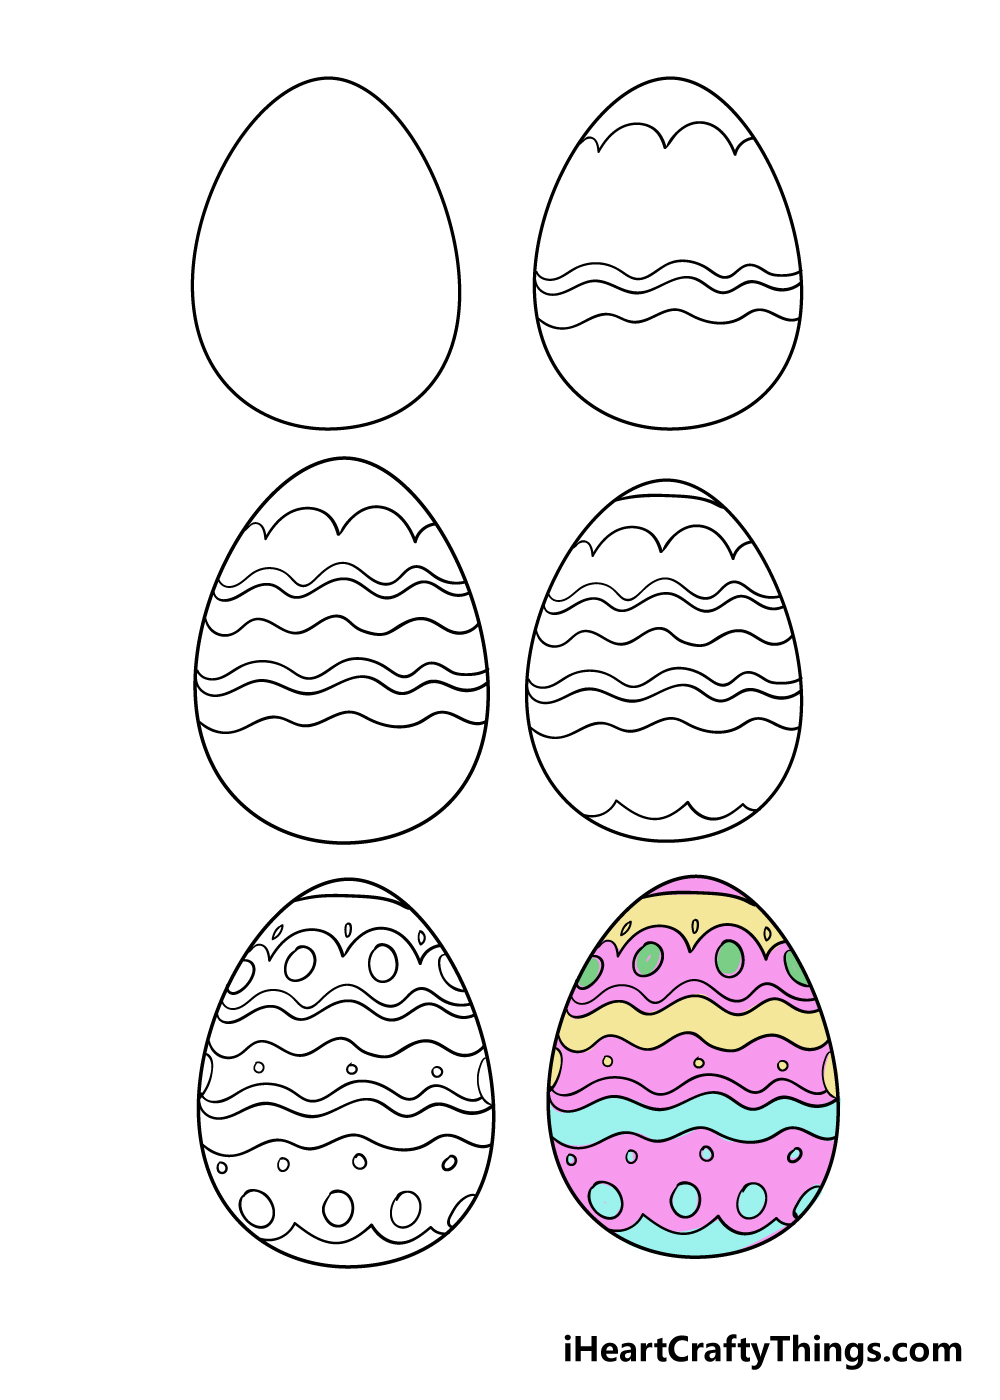
Step 1: Mastering the Egg Shape
To begin your Easter egg drawing, let's focus on creating the egg shape itself. You can try drawing a rounded egg freehand, just like in our reference image. However, if you find it challenging to draw a perfect oval, don't worry! There are a few options you can explore. You could print out the first step of this guide and use it as a reference to trace or draw the decorations inside. The key is to have fun and experiment with different techniques to achieve the desired shape.
Step 2: Adding the First Lines of Decoration
Now that you have the egg outline, it's time to unleash your creativity and start decorating! In this guide, we'll follow a specific design, but once you grasp the techniques, you can apply them to your own unique creations. Begin by drawing some sharply curved lines near the top of the egg to create a wavy pattern. As you move towards the midpoint of the egg, draw three wavy lines across it, gradually increasing the distance between them. These lines will contribute to the overall aesthetic of your Easter egg.
Step 3: Enhancing the Line Details
In this step, we'll replicate the line details from the previous step with a slight variation. This time, the lines will be placed above the previous set. Just like before, the first two lines should be closer together, while the third line should be slightly further away. Take your time and refer to the reference image to ensure your drawing matches the desired look. Once you achieve the desired effect, you're ready to move on to the next step!
Step 4: Adding More Definition to the Egg
In this simple yet impactful step, all you need to do is draw a curved line near the top of the egg and another wavy line near the bottom. These additional lines will add depth and character to your Easter egg drawing. Feel free to experiment with extra line details or incorporate your own creative touches. Remember, this is your masterpiece, and it's a fantastic opportunity to infuse your personal style into the design.
Step 5: Infusing Your Easter Egg with Final Details
Before we reach the final step of this guide, let's add some captivating circular details to elevate your Easter egg drawing. Use small to medium-sized circles to fill in the gaps between the lines. Take inspiration from the reference image and vary the sizes of the circles to create visual interest. Feel free to explore additional details, such as more lines, shapes, or even tiny pictures. This is your chance to let your imagination soar and showcase your unique artistic vision!
Step 6: Bringing Your Easter Egg to Life with Colors
Now comes the most enjoyable part – adding color to your Easter egg drawing! Similar to coloring a real Easter egg, you have the freedom to choose any colors you love. Our reference image features a delightful blue, yellow, and purple color scheme, but feel free to deviate and find your own color palette. Easter eggs come in all shades, so there's no wrong way to infuse life into your creation. Consider using acrylic paints or explore other art mediums to bring your Easter egg to life. Embrace your creativity and let the colors shine!
Taking Your Easter Egg Drawing to the Next Level
If you want to make your Easter egg drawing even more memorable, here are a few tips and suggestions to consider:
- Experiment with diverse decorations: Easter eggs can be adorned in countless ways. Whether it's patterns, shapes, pictures, or even text, let your imagination run wild as you explore various decoration styles.
- Expand your design: Why stop at one Easter egg? Add more eggs to your drawing to create a fuller image and open up opportunities for different designs. Change angles and decorations to give each egg its unique charm.
- Embrace additional Easter symbols: Consider incorporating other iconic Easter symbols, such as adorable Easter bunnies or fluffy Easter chicks, into your artwork. Let these elements enhance the overall festive spirit.
- Explore unorthodox art tools: Don't limit yourself to traditional mediums like colored pens, markers, or paints. Get adventurous and experiment with unconventional materials like glitter and beads. You never know what unexpected charm they might add to your Easter egg.
Congratulations! You've completed your Easter egg drawing, and now it's time to share your masterpiece with the world. We'd love to see your creations, so please share them on our Facebook and Pinterest pages and inspire others with your creativity!
Remember, this step-by-step guide is just the tip of the iceberg. You can find more incredible drawing guides like this on Shill Art – Express Your Creativity. Keep exploring, honing your skills, and let your imagination soar as you embark on endless artistic adventures. Wishing you a joyous and creative Easter celebration filled with color and inspiration! 🎨🐰🥚
Follow us on:
- Facebook fanpage:https://www.facebook.com/ShillArt.Official
- Facebook group:https://www.facebook.com/groups/FreeColoringPagesToPrint
- Pinterest:https://www.pinterest.com/ShillArtOfficial
More Coloring Books at here, see now:https://shillart.com/coloring-books