Are you looking for an easy paper craft project that your kids can enjoy? Look no further than this step-by-step guide on making a simple paper fish. Not only is it perfect for beginners in Origami, but it also allows children to get creative by adding their own personal touch.
Materials Required:
- Origami paper / Color paper (Any square size. Here we used a paper of size 10cm)

Step 1: Prepare the Paper
a. Cut a square paper of size 10cm.
b. Fold the paper diagonally from the right bottom to the top left so that the two corners meet.
c. Press firmly and make a crease.
d. Now, fold the bottom left corner to meet the top right corner as shown in pic d.

Step 2: Fold and Crease
e. Press it firmly and make a crease.
f. Unfold.
g&h. Now, fold the paper horizontally from bottom to top and make a crease.

Step 3: Additional Folds
i. Now, fold again from right to left (or left to right) as shown in the pic.
j. Unfold.
k&l. Fold the bottom edge towards the center along the crease we just made as a reference.

Step 4: Continuing the Folds
m. Fold the top edge towards the center along the crease we made in the last step as a reference.
n. Hold the paper figure vertically as shown in the pic n.
o. Fold the top edge towards the center, using the horizontal crease as a reference.
p. Do the same with the bottom edge.

Step 5: Unfold
q&r. Unfold.
In the next steps, we are going to make a pinwheel shape, which will become the body of the paper fish.
Step 6: Pinwheel Shape
s. Fold the top edge of the paper as shown in pic s. Note that since the paper is square and we have made folds on all four edges, it doesn't matter which side you fold from.

Step 7: Follow the Pictures
t. Starting from this step, carefully observe each picture and fold exactly as shown. Although it may look complicated, it's easy if you follow each step precisely.
After folding towards the center, with one finger, slightly lift one end of the folded part.

Step 8: Keep Folding
And fold as shown in the above picture (u).

Step 9: Continue with the Folds
v. Now, start lifting the opposite end by slightly opening the opposite corner and fold towards the center, exactly how we did in step u. This folding motion automatically opens the corner outwards, forming a triangle-like shape.

Step 10: Shaping the Fish Body
w. Start lifting the third and fourth corners at the same time, as shown in the picture.
x. After opening the third and fourth corners, slightly push the edge towards the center. Now, insert one finger inside the fourth corner's pocket and turn it outwards. This creates a pinwheel shape, resembling the body of a fish.

Step 11: Creating the Tail
aa. Fold the tail of the paper fish. Note the tip pointed by the right finger in pic aa.
ab. Lift the tip up.
ac. Fold that corner towards the center of the figure.
ad. Fold the portion pointing upwards downwards, creating the tail of the paper fish.

Step 12: Repeat the Tail Fold
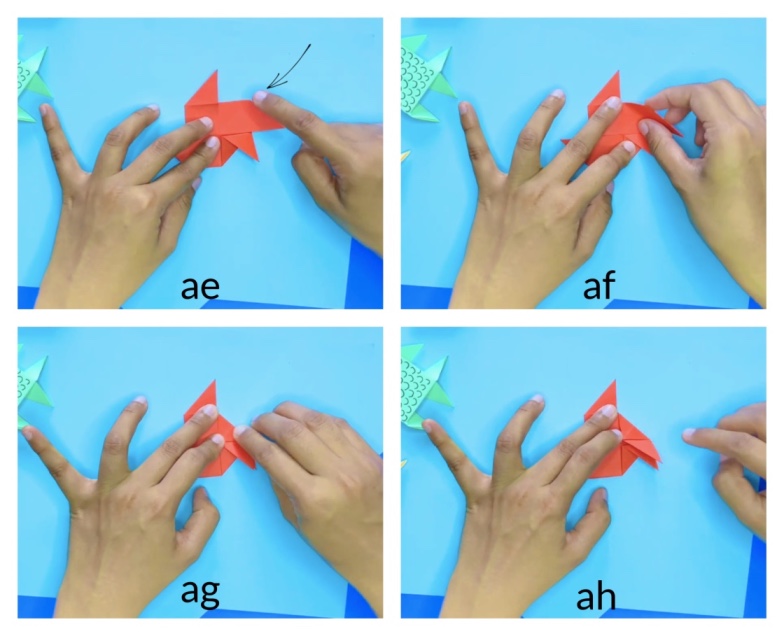
ae. Repeat the same steps to fold the other tail of the paper fish. Look at the corner pointed by the arrow.
af. Fold it towards the center. Open the tip of the folded part to reveal the tail of the paper fish.

Step 13: Finishing Touches
ai. Position the paper as shown in the picture. Now fold the tip marked by the arrow downwards (see pic aj).
aj. Fold the right edge towards the center, slightly sideways.

Step 14: Add the Final Details
am. Do the same on the left side. Fold the left edge downwards. Turn the figure over, and draw the eyes and scales. Your paper fish is now complete!
Video Tutorial:
If you have any doubts about any step, feel free to watch the step-by-step video tutorial below. For more craft ideas for kids, subscribe to our YouTube channel every week.
Express Your Creativity with Shill Art
We hope you enjoyed creating your very own paper fish! At Shill Art, we believe in expressing your creativity through various art forms. Visit our website Shill Art – Express Your Creativity for more inspiring craft ideas and projects.
Remember, crafting is not only fun but also a great way to bond with your loved ones. So gather your materials, unleash your imagination, and let your creativity soar! Happy crafting!
Note: All images used in this article are sourced from the original article.
Follow us on:
- Facebook fanpage:https://www.facebook.com/ShillArt.Official
- Facebook group:https://www.facebook.com/groups/FreeColoringPagesToPrint
- Pinterest:https://www.pinterest.com/ShillArtOfficial
More Coloring Books at here, see now:https://shillart.com/coloring-books

